Windows 7 provides an easy to use remote access feature called Remote Desktop. In the past this type of feature was the realm of Terminal Services servers, but lately it is getting wide use on the workstation scene. Whether you are wanting to access your desktop from another PC in the house, or remotely connecting into your home PC from the internet (after changing firewall/router rules), the remote desktop feature does the job perfectly.
Click the start button. Depending on your Windows 7 theme, it should look something like one of the two images below.
![]() or
or ![]()
Open the “Control Panel”

The control panel should open up as per the image below. If it doesn’t look like the picture below, drop down the “View by” option on the top right, and make sure its set to “Category”.

Click on the “System and Security” option. It will probably be in the top left corner in the control panel.

The “System and Security” screen will appear, as per the image below.
Click on the “Allow remote access” option, which is under the “System” heading.

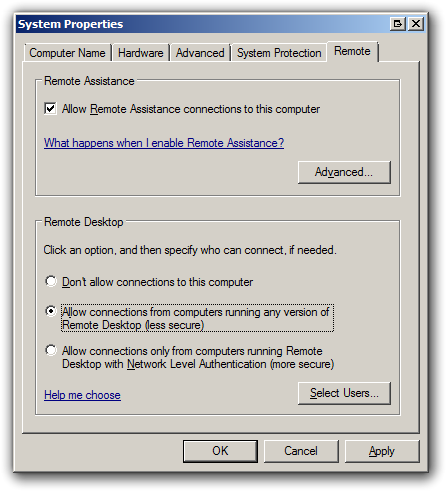
The “System Properties” window will now open. From here you can enable and disable remote access to the Windows 7 PC.

By default, the remote desktop option will be set to “Don’t allow connections to this computer”.
To enable it, select either the second or third option. In our example, we will be using the second option, as the PC we are using to connect, doesn’t have the Network Level Authentication features. The third option is the recommended option, but it can sometimes be best to get it working using the second option, and then switch to the third, more secure option, once you know everything is working as it should.
Select “Allow connections from computers running any version of Remote Desktop”
or
Select “Allow connections only from computers running Remote Desktop with Network Level Authentication”.

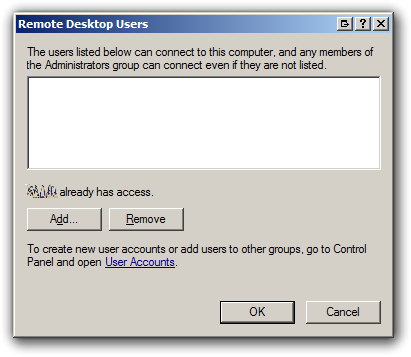
Press the “Select Users…” button. The following window should then appear.

From here you can add/remove users who have access to remotely connect into the PC. By default, your main user will probably have access already, and you may not need to change any settings on this screen. If you use multiple logins/users, you can add/remove them using the relevant buttons.
Click “OK” once done.

You will now be back at the “System Properties” window.
Click the “OK” button at the very bottom to complete the process.
You should now be able to remote into the PC from another computer on the network using the “Remote Desktop” client.

